
Calibrating recordings in Raven Pro
What do we mean by calibration?
When Raven opens a digital audio file, it sees a series of integer sample values that are proportional to the sound pressure (measured in pascals, Pa or µPa) received by the microphone or hydrophone when the recording was made. The sample values correspond to sound pressures at successive points in time as determined by the file’s sample rate.
By default the vertical axis of Raven’s waveform view, and amplitude measurements on selections (e.g., Max or Min Amplitude) display the sample values in dimensionless sample units. The sample values, along with the sample rate, are sufficient for displaying waveforms, spectrograms, and spectra, and for measuring relative amplitudes or power densities within a single recording (or across recordings that were made with the same recording system and settings).
However, if you wish to make absolute measurements of the recorded sound pressure, you will need to calibrate the sound file. To calibrate a sound file, you need to provide Raven with additional information about the recording system that can be used to calculate a calibration constant that Raven then uses to convert the sample values into absolute measurements of sound pressure, measured in µPa.
Do I need to calibrate my recordings?
Whether or not you need to calibrate your recordings depends on what types of questions you plan to address using those recordings. Many types of bioacoustic research don’t require calibrated recordings. If your work focuses on simply identifying species present in a recording, or on describing, measuring, or comparing spectral and temporal patterns of acoustic signals, then calibrated recordings may not be necessary.
However, calibrated recordings are essential for studies where you need to measure absolute received levels of sounds in your recordings. For example if you want to measure the received sound pressure levels of sounds from individual animals in order to estimate the source level of those sounds (taking into account the distance between the animal and the microphone), or if you want to compare ambient noise measurements to published studies or standards, the recordings must be calibrated.
Compared to working with uncalibrated recordings, calibrating recordings requires additional information that may not be readily available, or may require additional steps before or during field recording.
Calibration and the digital recording chain
The calibration constant that relates sample values to sound pressure units depends on three parameters that quantitatively describe the stages of the digital recording system:
(1) Transducer sensitivity: Transducer (i.e., microphone or hydrophone) sensitivity is the ratio of the transducer’s electrical output to its acoustical input, in units of V/Pa. This ratio is usually expressed in decibels relative to a reference sensitivity of 1 V/Pa (for microphones) or 1 V/µPa (for hydrophones). See Understanding Microphone Sensitivity.
(2) Preamplification: Because the analog output voltage signal from a transducer is typically quite small, that voltage is usually preamplified before being sampled. Depending on the recording device, the preamplification gain may be fixed, or may be varied by the user, either in discrete steps or continuously. Preamp gain (the ratio between the output and input voltages of the preamplifier) is expressed in decibels.
(3) Digitizer full-scale voltage: The “full-scale” voltage of the digitizer, also called the clipping voltage, is the input voltage for which the digitizer output will equal the maximum possible sample value for a given bit depth or sample size (typically either 16 or 24 bits).
Even if you don’t have access to these three parameters directly, you may still be able to calibrate your recordings, using one of two “end-to-end” calibration approaches, as described in the next section.
The actual sensitivity of any transducer and the actual gain realized by an amplifier at a given gain setting varies with frequency. However, high-quality transducers and amplifiers have a range of frequencies throughout which this variation is small enough (e.g., ± 1 dB) to be safely ignored (Merchant et al. 2015). This range of uniform or “flat” frequency response can be found in the manufacturer’s specifications for the device. Raven assumes that the frequency response of the recording system is flat throughout the recording range (i.e., from 0 Hz to the Nyquist frequency).
Calibration approaches
Here we provide a conceptual summary of three approaches that can be used to calibrate a digital audio recording (Figure 1). The next section provides specific instructions on how to calibrate a sound in Raven using each approach. Which approach you choose will depend on what type of information you have available about your recording system.
- “Stepwise” calibration: This approach depends on explicit knowledge of the transducer sensitivity, the preamp gain, and the full-scale voltage of the digitizer to calculate the calibration constant. This corresponds to the “technical specifications” approach described by Merchant et al. (2015).
- “End-to-end” calibration using a known full-scale pressure value for the recording system: This approach bypasses the need to know separate parameters for each component of the digital recording system. Instead, the behavior of the entire recording system (transducer, preamp, and digitizer) is described by a single parameter, usually the sound pressure represented by the maximum full-scale sample value that can be stored by the system. (Alternatively the recording system can be characterized by its “least significant bit” sound pressure, which is the smallest input sound pressure that will result in a non-zero sample value as output.)
- “End-to-end” calibration using a recorded calibration signal of known sound pressure: In this approach no parameter explicitly describing the recording system is needed. Instead, you record a sound of known amplitude using the same recording system and settings as used for the sound to be calibrated. The calibration constant can then be calculated from the known sound pressure of the calibration sound. The calibration sound may be a pure tone generated by a specialized acoustical calibrator such as a pistonphone that is trusted to provide a known sound pressure level. An alternative method for calibrating recordings using a sound level meter while recording ambient sound in the field is described by Mennitt & Fristrup (2012).
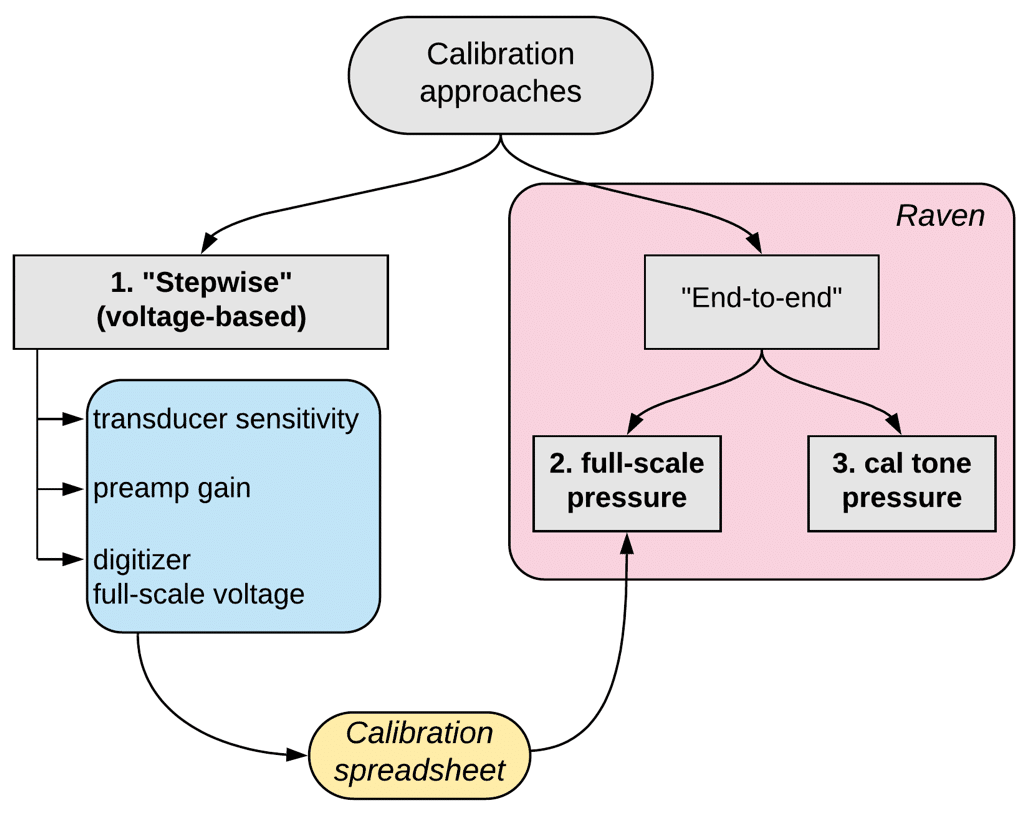
Figure 1. Approaches to calibrating digital audio recordings.
Calibrating recordings in Raven
The exact steps you use to calibrate a recording in Raven depend on which of the three calibration methods you use.
For any method, start by opening the sound file to be calibrated in Raven.
- “Stepwise” calibration
This method assumes you have access to the transducer sensitivity, the preamp gain, and the full-scale voltage of the digitizer.
Raven does not currently provide an interface for entering these three parameters directly, so you will need to calculate the full-scale pressure value of the recording system (you can download a handy spreadsheet that does that calculation for you; see below), and provide that to Raven as in method 2.
Download and open the Raven Calibration spreadsheet. Figure 2 shows the input section of the spreadsheet. Enter input data as follows: NOTICE: Errors were found in the Raven Calibration worksheet. An improved version of the worksheet will be available for download in a few days.
Medium: Choose “air” or “water” from the dropdown menu that appears when you click in this cell.
Microphone sensitivity: Enter the microphone sensitivity supplied by the manufacturer (or measured in the lab). Unfortunately, there is no universal standard way of expressing transducer sensitivity. For hydrophones, sensitivity is most commonly expressed in dB relative to a standard sensitivity of 1 V/µPa. For microphones, sensitivity is often expressed as dB re 1V/Pa (not µPa as for hydrophones). However, some microphone manufacturers report sensitivity in units of mV/Pa. In the spreadsheet, choose the appropriate units from the dropdown menu that appears when you click in the “sensitivity units” field. Options for units are “dB re 1 V/Pa” or “mv/Pa” for microphones, or “dB re 1 V/µPa” for hydrophones.
Microphone preamp: Enter the preamp gain in decibels.
Additional amplification: If any additional gain is provided elsewhere in the recording system (e.g., the analog stage of some digitizers may apply gain in addition to the preamp gain), enter that here, in decibels.
Digital max (FS) voltage: Enter the full-scale (FS) zero-to-peak input voltage (i.e., the maximum zero-to-peak voltage) that the digitizer accepts.
Bit depth: Enter the bit depth (typically either 16 or 24) of the samples that are stored by the digitizer.
The Output section of the spreadsheet displays the Full-scale sound pressure expressed both in dB re the standard reference pressure for air or water (20 µPa or 1 µPa, respectively) and in µPa (Figure 3).
Enter the Full-scale sound pressure value from the Output section of the spreadsheet into the Calibrate Sound dialog as described below for “End-to-end calibration using a known full-scale pressure value”.

Figure 2. The input section of the calibration spreadsheet. Yellow highlighting indicates cells where you need to enter calibration information.
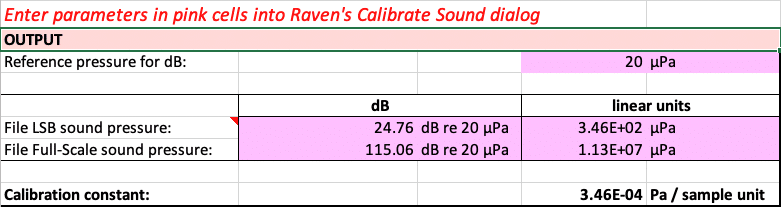
Figure 3. The output section of the calibration spreadsheet. The calculated Full-Scale sound pressure value (expressed either in dB or µPa) should be entered into Raven’s Calibrate Sound dialog (see Figure 4).
- “End-to-end” calibration using a known full-scale pressure value for the recording system
If you know the sound pressure (either in µPa or dB) that corresponds to a full-scale zero-to-peak digital sample value for your complete digital recording system, you can provide that to Raven as a single “end-to-end” calibration parameter as follows:
Open the Calibrate Sound dialog by choosing Edit > Calibrate…
In the Calibrate Sound dialog (Figure 4), choose Preset > Medium, then choose “Air”, “Freshwater”, or “Seawater”. Choosing a Medium preset automatically selects the Acoustical calibration paradigm and fills in appropriate values for the Medium Properties panel of the dialog.
Enter quantities into the Known Quantity panel:
-
-
- (a) choose Pressure as the known quantity;
- (b) choose File Full Scale
- (c) choose either “dB” or “microPa” as the units
- (d) enter the value for the full-scale (zero-to-peak) sound pressure (in either dB or µPa).
-
[optional] Choose Preset > Calibration > Save as… to save a calibration preset for future use with the current file or other sound files that were recorded with the same system and settings.
Click OK.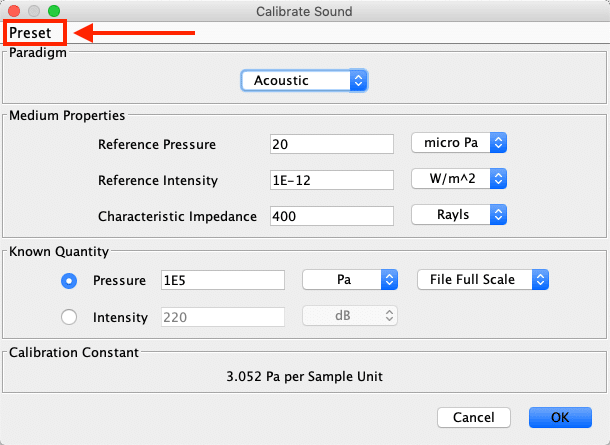
Figure 4. Raven’s Calibrate Sound dialog, with the Preset menu highlighted.
- “End-to-end” calibration using a recorded calibration signal of known sound pressure
If you have a recording containing a calibration sound of a known sound pressure (e.g., a pure tone generated by a pistonphone, or some other sound that was measured by a sound level meter[1] as it was being recorded), you can provide that information to Raven as follows:
Create a selection containing just the calibration signal in Raven. This step needs to be done before you open the Calibrate Sound dialog. The time bounds of the selection should not extend beyond the beginning or end of the cal tone. The frequency bounds of the selection are ignored for purposes of calibration.
Open the Calibrate Sound dialog by choosing Edit > Calibrate…
In the Calibrate Sound dialog (Figure 4), choose Preset > Medium, then choose “Air”, “Freshwater”, or “Seawater”. Choosing a Medium preset automatically selects the Acoustical calibration paradigm and fills in appropriate values for the Medium Properties panel of the dialog.
Enter quantities into the Known Quantity panel:
-
- (a) choose Pressure as the known quantity
- (b) choose Active Selection RMS from the menu to the right of Pressure
(If this option is not shown in the menu, there is no active selection defined; click Cancel in the dialog, create an active selection in the cal tone as described above, then return to the Calibrate dialog.) - (c) choose either “dB” or “microPa” as the units
- (d) enter the known RMS sound pressure for the calibration tone (in either dB or µPa).
[optional] Choose Preset > Calibration > Save as… to save a calibration preset for future use with the current file or other sound files that were recorded with the same system and settings.
Click OK.
Working with calibrated recordings
Once your recording has been calibrated, the vertical axis of the waveform view will be labeled in pressure units (µPa) rather than dimensionless sample units. Power density values in the spectrogram, spectrogram slice, selection spectrum, and colorbar views will be shown in dB re the appropriate reference value rather than dBFS (dB relative to full-scale sample values).
Calibration presets
Each time you re-open a calibrated file in Raven, you will need to re-apply the calibration information. The easiest way to do this is using a calibration preset. If you save a calibration preset (via the Preset menu in the Calibrate Sound dialog, Figure 4) for a sound file, you can have that preset automatically applied the next time you open the sound by choosing that preset in the Calibration tab of the Configure New Sound Window dialog that appears after you choose a sound to open (Figure 5). You can use the same preset for any other sound file that was recorded using the same recording system and gain settings.
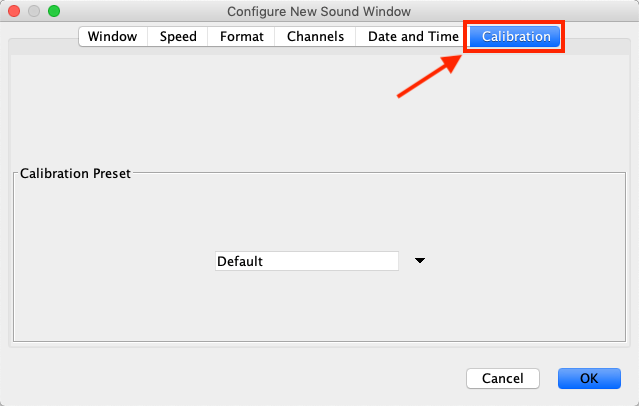
Figure 5. The Calibration tab of Raven’s Configure New Sound Window dialog. This dialog appears after you select a file to open.
Literature cited
Mennitt, D. J., & Fristrup, K. M. (2012). Obtaining calibrated sound pressure levels from consumer digital audio recorders. Applied Acoustics, 73(11), 1138–1145. https://doi.org/10.1016/j.apacoust.2012.05.006
Merchant, N. D., Fristrup, K. M., Johnson, M. P., Tyack, P. L., Matthew, J., Blondel, P., & Parks, S. E. (2015). Measuring acoustic habitats. Methods Ecol Evol, 6(3), 257–265. https://doi.org/10.1111/2041-210X.12330
[1] If you use a sound level meter (SLM) to measure a calibration sound while it’s being recorded, it’s important that the meter be configured to report unweighted (also known as “Z-weighted” or “flat”) sound levels. Many SLMs by default report “A-weighted” measurements, which will yield erroneous results in this procedure. Inexpensive SLMs often lack the option to report Z-weighted levels.