
Best Practices for Data Management
Introduction
The introduction of the Machine Learning Detector into Raven Pro has made the analysis and interpretation of large-scale passive acoustic monitoring (PAM) projects easier and more efficient than ever. This article will suggest best practices for data management that will save you time and reduce analysis errors.
Discussion
When new users explore Raven, they typically open one sound file at a time before creating a selection table as suggested in the Video Tutorial. As new users progress to automated sound detectors they may be attracted to batch mode detection, which has a number of drawbacks. Batch mode detection has proven unreliable, skipping over some of the specified sound files, particularly when using the Machine Learning Detector. Even if you check and find that a batch mode detection has output a selection table for every specified sound file, you will likely find that batch mode detection fails to detect sounds of interest near file boundaries. You may also find that analyzing and summarizing batch mode output, which consists of one selection table for each input sound file, is time-consuming and prone to user error because the analyst must:
- Open many sound files one by one in Raven.
- Configure many sound windows with the desired size, number of views, zoom settings, spectrogram parameters, brightness, and contrast one by one.
- Match the correct selection table to each sound window one by one.
- Add measurements to many selection tables one by one.
- Recalculate measurements in many selection tables one by one.
- Open multiple sound windows to compare selections in different sound files.
- Configure the Selection Review and Annotation for selection tables one by one.
- Calculate summary statistics across all selection tables.
- Find sound events when you can’t remember which sound file they are in.
- Etc.
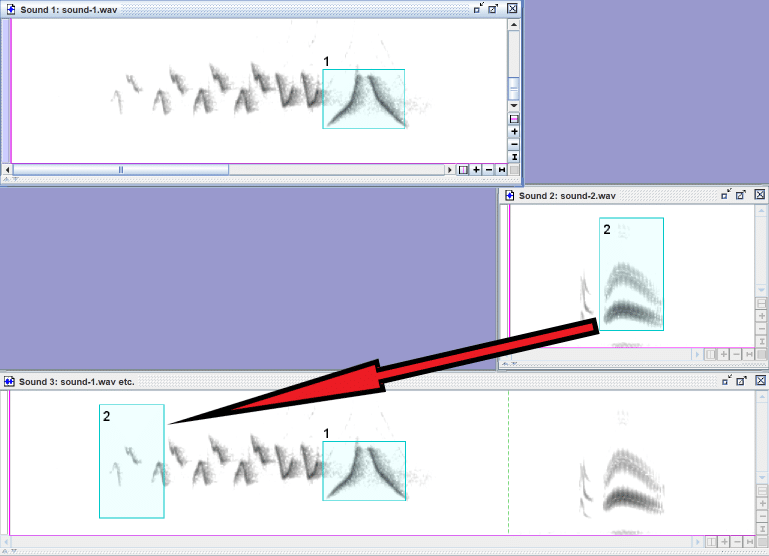
In projects with many sound files, it is generally more efficient and less inviting of errors to open a sound file sequence with all sound files for a given site together in a single sound window. Unfortunately, selection tables created in sound windows with only one sound files opened cannot easily be opened into a sound window with a sound file sequence because the primary time reference, the “Begin Time” and “End Time” columns, describe the number of seconds to the beginning of the sound window. In the image below, “Begin Time” is 0.138 seconds for selection #2. When sound-1.wav and sound-2.wav are opened together, selection #2 is displayed 0.138 seconds from the beginning of the sound file sequence.
Suggestions
This section discusses the following practices, which work synergistically to increase efficiency and reduce user error:
- Keep a Research Protocol Document
- Use Informative Sound File Names
- Organize Sound Files By Site
- Use Paged Sound Windows
- Make and Use List Files
- Configure Real Clock Times
- Save Sound Window Presets
- Run Detectors in Full Mode or Interactive Mode
- Review Detector Output With the Selection Review and Annotation Feature
- Ask For Support
Keep A Research Protocol Document
You will save yourself a lot of work a frustration if you keep a detailed protocol document including details like the following:
- Project name
- Deployment data (see “Field Practicalities” in Virtual Lab: Sound Analysis Principles)
- The names and locations of your recording sites.
- The date range as well as a device identifier for each deployment at each site.
- Recorder settings for each deployment, including sample rate, bit depth, number of channels, and recording schedule.
- Naming convention for sound files, selection tables, and other data forms.
- Sound analysis protocol
- Detailed protocol for each analysis step so you can accurately report it in any reports and papers you write as well as reproduce the protocol years later when you cannot remember it well.
- Names of analysts performing protocol.
- Spectrogram parameters, spectrogram brightness and contrast, page length and other settings for every step of analysis.
- Preset names.
Use Informative Sound File Names
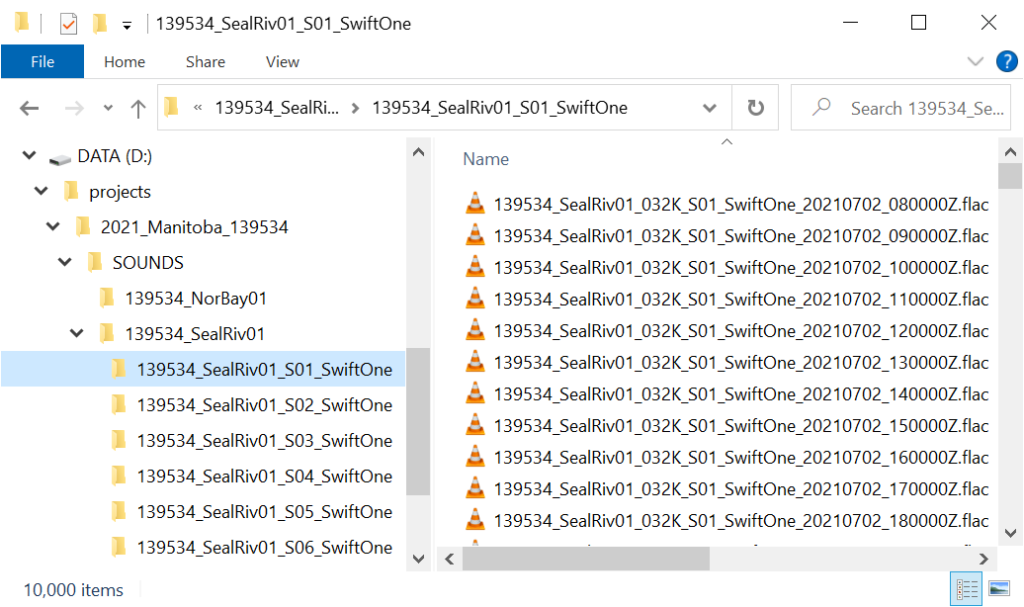
Sound files should have file names specifying at least the recording site and time of recording. For example, SealRiv01_20210702_080000Z.flac. This will reduce confusion about where the recording was made and when it was recorded. It will also allow you to configure Raven to display the date and time of sound events.
Some investigators prefer longer file names. If you think you may have multiple recordings at multiple sites, you may find it helpful to add additional information to file names to reduce confusion. One possible convention would be file names like:
139534_SealRiv01_032K_S01_SwiftOne_20210702_080000Z.flac
- 139534: project code
- SealRiv01: region name
- 032K: sample rate
- S01: site name
- SwiftOne: recorder model
- 20210702_080000: time stamp
- Z: Universal Coordinated Time (UTC±00:00)
- .flac: file extension indicating FLAC sound file format
Organize Sound Files By Site
Move all sound files for each site into a site-specific folder with the site name in the folder name. This will make it easy to open all sound files for each site into a single Raven sound window, which will allow one selection table to have selections from any time in the recording for that site.
Use Paged Sound Windows
When you open long recordings in Raven, it is essential open them into paged sound windows to prevent memory management issues and to give you additional controls for navigating through long recordings.
Paged sound windows are demonstrated in:
Paged sound windows are also described on pages 187 – 192 in the Raven Pro User’s Manual.
Make and Use List Files
After creating one or more selection tables for a sound file sequence, it is essential to open exactly the same file sequence every time you use that selection table. Once you have created a selection table for the sound file sequence, adding or removing a file from the sequence may render the selection table unusable.
The use of Raven list files will help ensure that the same sound file sequence is opened every time. List files also can act as a permanent record of sound files that were used for a given analysis.
List files generated in Raven Pro by selecting “Save As List File” in the File menu are often unusable, since they do not include the full path to the sound files.
Better list files can be created using Raven Compass. You can download a Raven Compass installer from https://updates.ravensoundsoftware.com/updates/workbench/raven_compass/. Once you have installed Raven Compass, you can use it to generate list files as follows:
- Click the “Input” button to select the folder with your sound files.
- In the “Convert from” field, select the file extension that your sound files have.
- Click the “Tools” button and select “Generate List File” to see what files you have selected to be included in your list file.
- Click the “Save” button to choose the name of your list file and the path it will be written to.
Some users prefer to generate list files using Windows Command Prompt, Terminal, R, Python, or some other scripting language.
Configure Real Clock Times
The Real Clock Times feature allows users to set up Raven so that it can report the date and time on the horizontal axis of spectrogram and waveform views, as well as on individual sound events. For details, see Real Clock Times.
Sound Window Presets
Sound window presets allow Raven users to quickly configure sound windows in Raven. This saves time and improves the accuracy of sound analysis by ensuring consistent research protocols. Sound window presets can also be shared among analysts working on the same project to help reduce inter-observer error. For more information, see Sound Window Presets and pages 71 – 74 in the Raven Pro User’s Manual.
Run Detectors in Full Mode or Interactive Mode
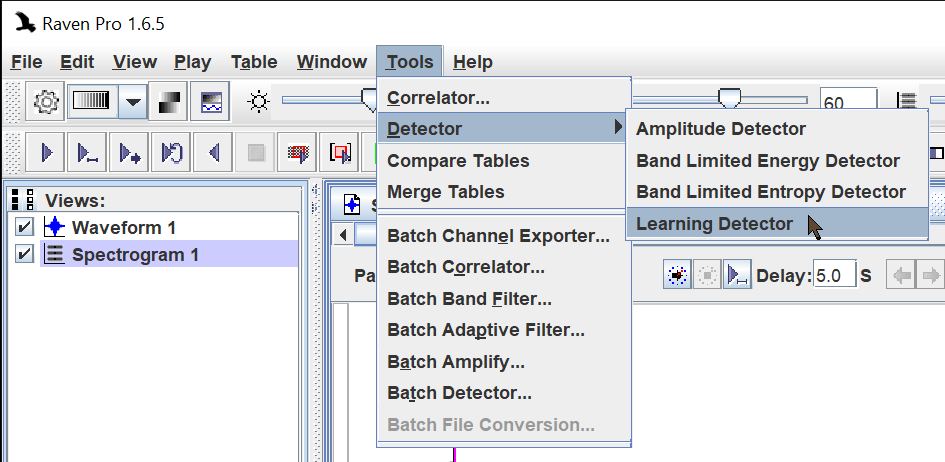
When running Raven’s automated sound detectors, user full detection mode to ensure that:
- Selections generated by the detector all go into the same selection table.
- Selection tables can be opened into your sound file sequence.
Full detection mode can be initiated by opening the Tools menu and selecting “Detector” then the detector you want to use. Details about setting up the new Machine Learning Detector can be found in Machine Learning Detector – Running Detections. Details about setting up the Amplitude Detector, Band Limited Energy Detector, and Band Limited Entropy Detector can be found in Chapter 10 of the Raven Pro User’s Manual.
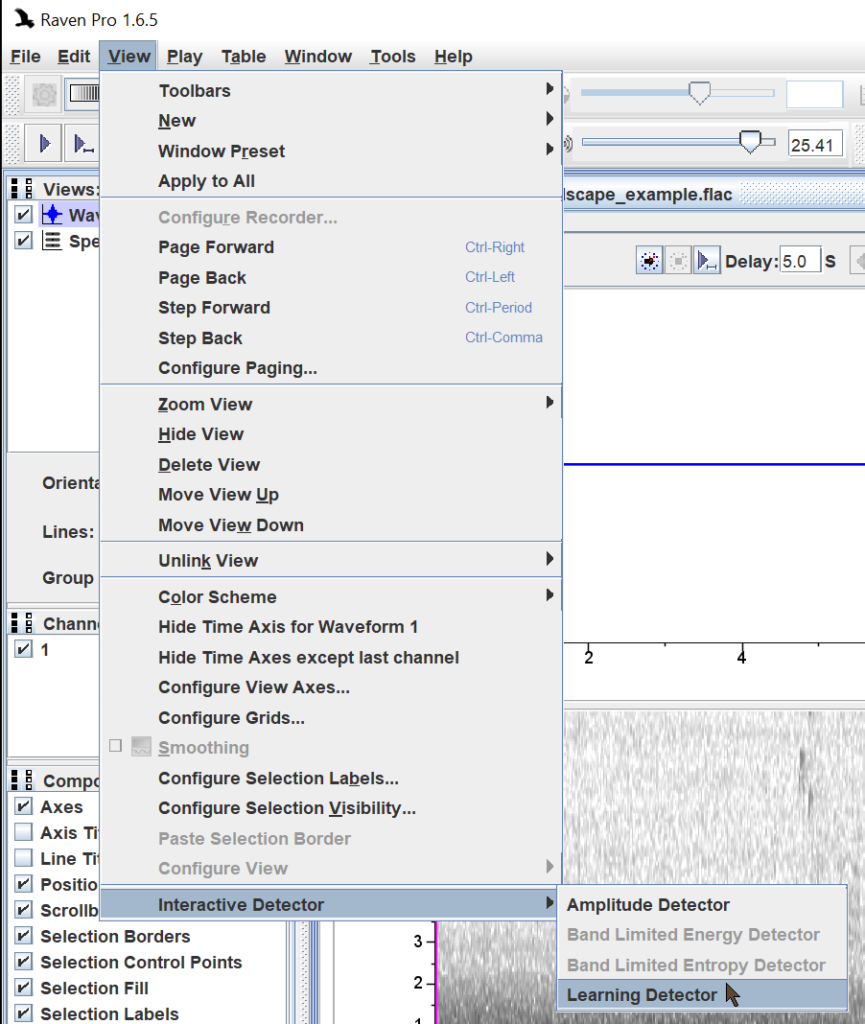
If you prefer to run a detector on only the current page in a sound window so you don’t have to wait for a full detection, you might prefer to use interactive detection mode. This might be useful for doing a quick check to see how changing detector parameters will affect detector performance.
Interactive detection mode can be initiated by opening the View menu and selecting “Interactive Detector” then the detector you want to use. Alternatively, right-click in the sound window and select “Interactive Detector” then the detector you want to use.
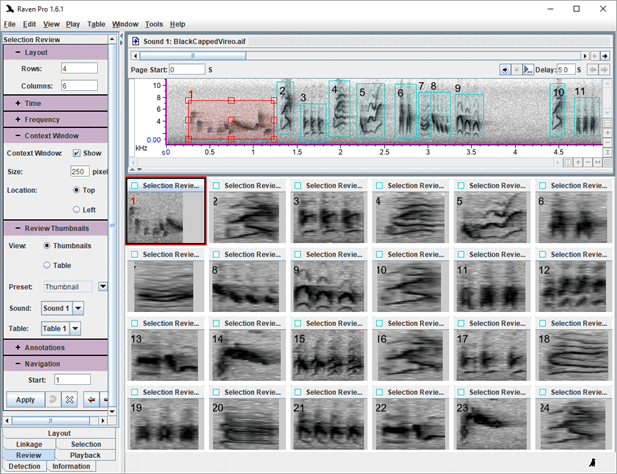
Review Detector Output With the Selection Review and Annotation Feature
One of the most efficient ways to review detector output is to use the Selection Review and Annotation feature, which allows you to view and annotate selections two or three orders of magnitude more efficiently than the standard Raven user interface.
One standard workflow it to annotate selections as TP or FP, that is true positive or false positive. This information can be used to estimate parameters like precision and false positives per unit time, determine whether sounds you are interested in are present, generate sound clip libraries, and other useful tasks.
For details about how to set up the Selection Review and Annotation feature, see Selection Review and Annotation.
Keyboard Shortcuts
Some research analysts like to use Keyboard Shortcuts.
Ask for Support
Friendly and responsive Raven Support is available at raven_support@cornell.edu. You may also find it helpful to review the Raven Video Tutorials, Knowledge Base, and Virtual Lab: Sound Analysis Principles.
Our Capacity Building team is developing online material that will more complete guidance about how to organize PAM and other bioacoustics research. Here are two places to monitor for new content at Yang Center Education page and the Yang Center YouTube channel.
Our capacity building team would also be happy to give you tips about PAM study design in one of their Virtual Office Hours.